Availability varies — call to confirm. · (855) 768-9249
Roof-to-Wall Flashing Repair in the United States
Wall Joint Leak Repair

National Roof Leak Repair at Wall Transitions

Heat can expand adjoining roof and wall materials, while cold can stiffen them; repeated freezing and thawing may stress their overlaps. Rain or wind can reveal a weak point at different times of year. Record when moisture returns so the inspection can account for the conditions.

WORK PLAN

A roofer traces interior moisture, checks accessible attic evidence, then inspects the roof-to-wall joint and nearby roof areas. They repair failed flashing or adjoining layers, restore protective overlaps, and address damaged material beneath when needed. The findings distinguish a transition leak from another nearby roof fault.

INDOOR LEAK CLUES

Seams in Shingle and Flat Roofs

A wet upper-wall corner may lead you to look into whether a roof leak needs attention.

A narrow ceiling stain follows the wall’s sloping edge.

Paint lifting in a narrow band where a sloped ceiling meets an exterior wall can point to recurring moisture near that junction. Water may track behind the cladding or along framing, while a nearby roof defect can leave a similar mark. Indoor condensation can dampen the ceiling edge when warm room air reaches a cold roof surface.

Paint blisters high on the room’s outside wall.

Paint that blisters or flakes near a roofline suggests moisture has reached the finish, but it does not identify the route. Compare the affected patch with nearby ceilings and wall corners, and note any change after wet weather. An inspection can check whether the junction or another source matches the pattern.

Musty odor lingers near the upper wall after rain.

A persistent musty odor beside an upper exterior wall can point to damp material hidden behind the surface, even without a visible drip. The smell alone cannot locate the entry. Record where it is strongest and whether it changes after rain so the roofer can focus the inspection.

A damp patch returns when rain blows against one side.

Dampness that appears only during wind-driven rain suggests water may be reaching the wall junction from the side rather than following ordinary roof runoff. The wind direction and the side of the wall that becomes damp can help focus the inspection. Note the weather and affected area, then arrange a roof assessment.

Attic insulation darkens beside the roof’s outer framing.

Wet insulation or darkened framing near the roof’s outer edge shows moisture has reached the attic structure. The source could be the wall transition or a nearby roof detail. Moisture may have reached the roof sheathing as well as the insulation or framing.

Findings That Shape a Repair Plan

A roof-to-wall joint combines roof drainage with wall protection, so an inspection considers how those layers meet. Ranches, split-levels, and subdivision homes also differ in roof shape and wall materials, so the inspection needs to match the individual house.

The listed service area determines whether a referral is available for an individual inspection. Places with their own pages are identified there; other covered areas connect through the same referral. Roof design and local conditions still need an individual inspection.

City and county pages provide local information for the places they cover; elsewhere, requests use the same referral route. A clear description of the concern helps explain what the inspection needs to address.

Tracing Water Inside the Home

Interior Clue
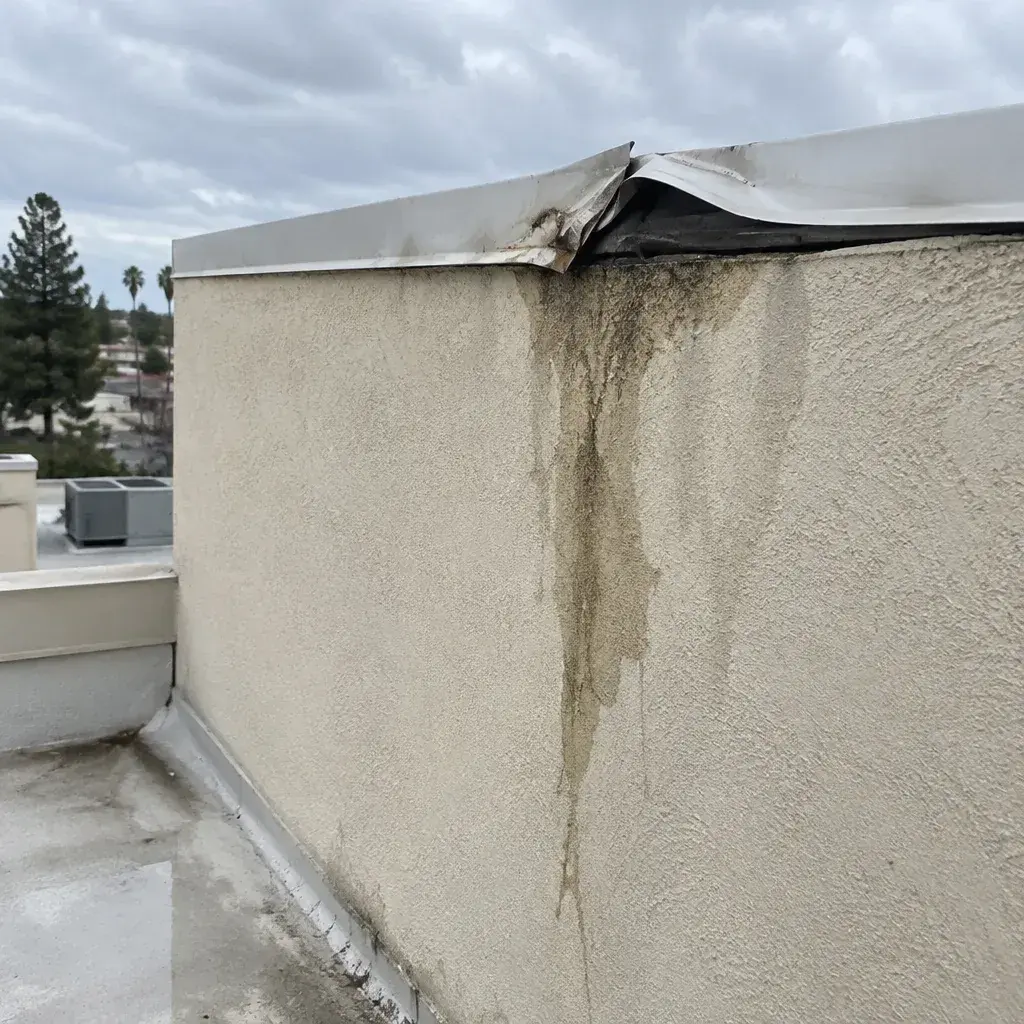
A lifted flashing edge can leave a path for water behind the wall covering.
Cladding Path
Wall cladding and the water-resistive layer should shield the upper edge of the roof junction and direct moisture outdoors.
Flashing Layout
Roof-to-wall joints bring roof drainage and wall protection together at one transition.
Source Check
Attic clues, wall moisture, and nearby roof materials help a roofer test whether the junction or another detail is leaking.
Repair Scope
Regional weather and house materials differ across the country, so each transition needs an inspection suited to that roof and wall.
Service Reach
Heat can expand adjoining roof and wall materials, while cold can stiffen them; repeated freezing and thawing may stress their overlaps. Rain or wind can reveal a weak point at different times of year. Record when moisture returns so the inspection can account for the conditions.
ROOF DESIGN
an estimated $350–$900

Following a Leak’s Route Through the Roof

Roof shingle leak. Both can leave moisture near an upper wall, but a shingle fault begins on the roof surface while a transition failure begins where roof and wall layers meet. The attic trail and exterior inspection help distinguish them. The roofer compares the moisture trail with the roof surface and wall edge. A trail that begins at the junction supports a transition leak; evidence starting higher on a roof plane or at another detail points elsewhere. Attic clues can help test which route fits.

What Guides a Roof Leak Repair Plan

The roofer starts with the location and timing of interior moisture, then checks accessible attic framing for damp trails. They compare those clues with the roof edge, nearby roof covering, wall cladding, and visible flashing overlaps to see which entry path best fits the evidence.

After locating the likely failure, the roofer opens the joint as needed to reach affected layers. The roofer identifies which exposed layers are sound before selecting replacement materials. The repair scope follows the materials found in the inspection.

For a contained failure with no signs of spread, ask whether the repair can be completed during the inspection visit. Ongoing attention is useful when leaks recur or new damp areas appear; it should follow evidence of a continuing issue, not be assumed after one repair.

WHEN ROOF EVIDENCE SUPPORTS WORK OR ANOTHER CHECK
Roof Components Limited-Area Work
One entry point found before broader damageInterior protection
New drips follow completed leak workFlashing condition
Water emerging across distinct roof zonesRoof opening seals and shingle layers reset

Ground-Level Checks Around Roof Edges

From indoors, write down where moisture appears and when, and take photos as marks change. Move belongings from the affected area and contain drips if that is safe. You can look for attic clues only from a stable, accessible area. Share those observations with the licensed pros we connect you with.

Choosing the Right Roof Leak Repair

Water at a roof-to-wall joint can dampen concealed wood and insulation, and may reach wiring near an interior wall or ceiling. Keep people clear of sagging surfaces, and avoid touching wet switches, outlets, or fixtures. Concealed insulation or framing may remain damp beyond the visible mark. Have the roof and affected area assessed.

Does Roof Access Change the Cost of Repair?

Compare the recommended work with the estimate, and ask how the roof materials involved affect the repair approach and expected amount.The guide range reflects a roof repair approach supported by inspection findings; it does not price every possible method for addressing the same leak. The amount of repair work depends on what the inspection finds around the leak.See how repair type and roof conditions shape the total in the pricing guide.
ATTIC EVIDENCE

Roof Repairs Along Water Drainage Paths

Ridge Cap Leak Repair

Across the United States. A roofer checks ridge-cap overlap, fasteners, and bedding, then…

Common Leak Concerns

Leak Repair FAQs

What has to come apart to repair flashing where a roof meets a wall?

A roofer follows the interior moisture trail, checks accessible attic framing, then compares those clues with the roof edge above. At the junction, they look at how step flashing sits between roof courses and whether the wall covering and water-resistive layer protect its upper edge. If another roof fault better fits the evidence, that changes the repair plan. A visible stain may show where water emerged, not where it first crossed the roof.

Which materials meet where a roof joins an outside wall?

The roofer may find step flashing between the roof courses, counter flashing or wall layers shielding the joint, and cladding outside those layers. Each part must overlap in a way that sends water back outdoors as it runs down the roof or wall. The inspection also checks whether nearby shingles or another roof detail could account for the moisture, since a mark indoors alone cannot identify the failed part.

What should I do if a wall becomes damp after rain?

At the junction, the roofer checks whether each shingle course has step flashing and whether the counterflashing and wall water-resistive layer overlap to shed water outward. If a section is loose, corroded, or covered incorrectly by cladding, the repair may require lifting nearby roofing or siding, correcting the flashing sequence, and restoring the wall layers in order. The roofer should also check nearby shingles so a separate roof fault is not mistaken for a junction leak.

Which materials might need attention during a roof-to-wall repair?

A repair should address the route water took through the joint, not only the interior stain. The roofer checks how far moisture traveled before deciding which materials need access or replacement. A small opening may call for a focused repair; concealed damage or a separate nearby roof fault can change the scope. Ask which findings support the proposed work.

Start an Inquiry

Not sure how far the leak has spread?

Contact the pros we connect you with and describe the signs you have noticed indoors. First settle whether there is a fee for the inspection; then arrange a time. Check whether the leak is accompanied by a musty odor or visible mold.

Call (855) 768-9249
Confirm availability, inspection charges, and written scope
Call (855) 768-9249 Schedule Online